Projects
Following a Project
Any member of the Platform can follow any Project! That’s how people can easily “connect” themselves with a Project they might be interested in, even if they don’t actually participate in its proceedings.
All it takes to follow a Project is to visit the Project’s page on the site and to click on the “Follow Project!” button:

Clicking the button sets things in motion. A new modal window is presented with further information and buttons that provide actions. Registered users can just click Follow again to confirm their choice. Unregistered users or users who haven’t signed are redirected to the login page.
For now, followers have access to Newsletters sent by the Projects owners.
But that is just the beginning: In the future, followers can easily have access to additional information and resources compared to outsiders (registered users of the platform who are not members of a Project). Furthermore, this function opens up numerous possibilities for community building: For example, every Project in the future could have a list of followers and “participants” (people actively working on a Project), while every user could have the list of the Projects they follow or participate on their profiles!
Newsletter tool for Project owners
The Newsletter tools allows the owner(s) of a Project on the AIoD Platform’s CMS to send an email Newsletter to all its members. The newsletter contains a custom subject and introductory text, as well as links, summaries, and images of selected relevant content (e.g. News, Open Calls, etc.).
The Newsletter is an important addition to the AIoD Platform, as it provides several benefits to Project owners and members. Members can easily connect with the Projects they are interest in and they will be kept informed with timely updates and relevant information.
How can a Project owner share content via a Newsletter?
There is a significant amount of engaging content that is published on the CMS on a weekly basis. However, unless users take the initiative to visit the site, they may not have the opportunity to view this content. By receiving a newsletter that includes the latest updates and insights related to the Projects they have chosen to follow, users can stay informed about any important events or developments.
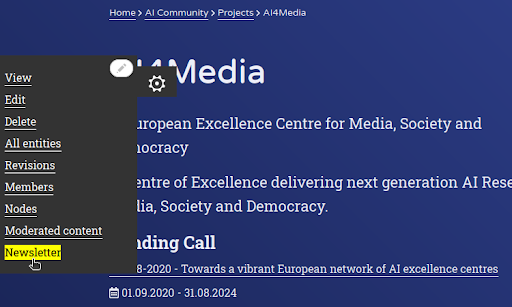
Step 1. Go to the Newsletter tool
Project owners can easily start building a Newsletter using the relevant option from the “Local tasks” side-menu of their Project which as usual provides access to all options related to the management of the Project:
Step 2. Pick a subject
The Subject is really important as it’s going to be the Subject of the email itself and also the Title at the header of the Project’s Newsletter. A sensible default is automatically set, although Project owners should provide their own - they can certainly leave out the Project’s name as that will always appear on the Newsletter, right below the Platform’s logo.
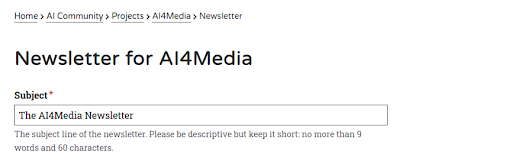
Validation rules: Subject should not be less than 10 characters or longer than 90 characters. There are many articles and researches that define the optimal subject length, but as a rule you should keep in mind that notifications which appear on mobile screens are usually truncated at about 40 characters.
Step 3. Write an introductory text (body)
The body is the introductory text of the Newsletter and appears right underneath the platform’s logo and the title (Subject). It should contain a personalised message from the Project owner to all the Project’s members. Usually, it contains the most important information for people who are short on time.
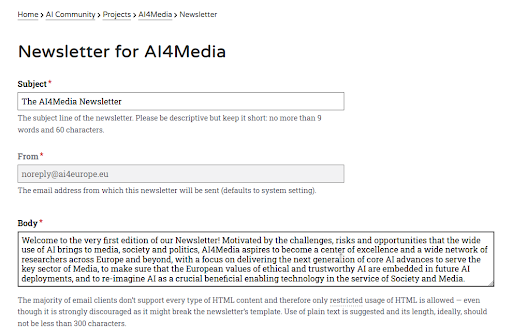
Validation rules: Body should not be less than 200 characters. As its purpose is to put the most important information first, it should at least be longer than a SMS. Only restricted usage of HTML is allowed: Links within the CMS, simple lists, quotes and other elements can be used. More details about how to utilise restricted HTML are provided via the modal that appears by clicking the dotted link (restricted).
Step 4. Pick interesting and relevant content
Project Owners have already added a lot of related content to their Project. They can now easily share that content with all the members of a Group, just by selecting it with a checkbox. The content is sorted in reverse chronological order and the selected items are indicated with a bright yellow colour.Nothing else needs to be done: The newsletter will contain the title, the link and the short summary of each item (images will be resized and optimised automatically for an email).
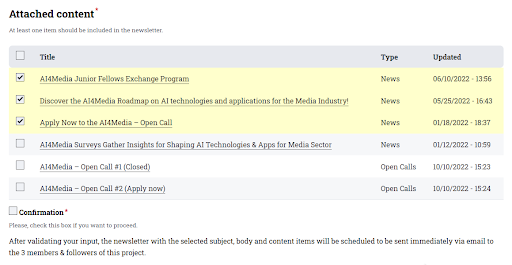
Validation rules: At least one content item should be selected. It’s not allowed to send all content items, unless their total number is less than 4. These restrictions were set in order to: a) make sure that the Newsletter sent contains at least one link that readers can follow to read more relevant information, b) avoid sending all the content items by accident as the checkbox next to the “Title” does exactly that.
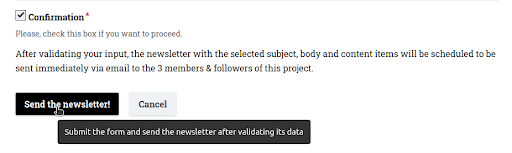
Step 5. Confirm your choices & sent the newsletter!
It’s not possible to send a Newsletter without checking the Confirmation checkbox. This ensures that no Newsletter is sent by accident, while providing a short summary of the action (“will be sent immediately via email to the N members of this project”).